Creating vinyl stickers with a Silhouette Cameo 4 can be an enjoyable and creative experience. I am a professional crafter and have been creating such interesting vinyl stickers for more than two years now. If you land here to learn ‘How to make Vinyl Stickers with Silhouette Cameo 4‘, you are in the right place. I will tell you all the basic steps involved in making this project. Even if you have never tried making these stickers before, after reading this blog, you’ll learn how to do it.

A vinyl sticker is a meaningful project that you can use during an event or to organize your important stuff. Moreover, you can create decorative stickers that will add an extra glow to your home on special eves. So, let me guide you through the steps to make professional vinyl stickers. Here we go!
Step 1: Launch Silhouette Studio
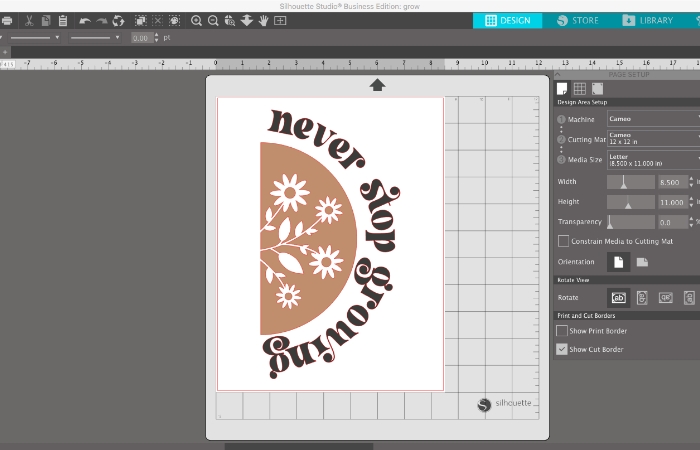
This is the first step towards creating a perfect vinyl sticker with your Cameo 4. If you don’t know what it is, let me tell you. Silhouette Studio is a special software that helps you design different items with Cameo machines, including vinyl stickers. So, you will only be doing your projects with this software.
Step 2: Select the Size of Your Vinyl
Once you are on the Silhouette Studio’s interface, you need to set up the particular size of your vinyl. Usually, the size is about 12 inches in width. The fun part is that Silhouette doesn’t need a mat to cut vinyl, so you can choose your vinyl size absolutely freely. I have made many vinyl designs for my home and office decor. You can also create vinyl for different purposes.
Step 3: Type Text or Add Design
I hope you’re getting how to make vinyl stickers with Silhouette Cameo 4. Once you have selected your vinyl size, you are ready to add text or design to your vinyl. You can modify your text size and font, as well as your design. You can also upload some designs from your computer’s storage.
An added advantage is that you are not limited to the default font styles of Silhouette Cameo. Instead, you can get new fonts from external sources as well. I also did the same for many of my vinyl projects.
Step 4: Start Cutting Your Vinyl

Once you are done with a proper vinyl design, text, size, and detailings, your sticker is ready to be cut. So, before you start cutting, you can check the cut lines to ensure that whatever you want to cut will be cut precisely. If you don’t set up the design with cut lines, your sticker will not cut the way you want.
To start the cutting, place your vinyl in the specific holder provided. And do you know Silhouette will adjust its settings automatically based on the material you use? This feature is great in Silhouette Studio. Whenever I made something with Cameo 4, I didn’t really adjust the settings. Like me, you will also have some relief from constantly changing the settings.
Step 5: Remove Vinyl From Your Machine
You have finally learned “how to make vinyl stickers with Silhouette Cameo 4“, and you are ready to apply your vinyl stickers to the desired surface. Once your machine is done with cutting the vinyl, you can easily remove the vinyl by hitting the button. After that, you can use scissors to cut and separate each vinyl piece. Now, you can remove the leftover vinyl pieces from the sides of your stickers. This step is important to give your stickers a proper finish that looks professional and debris-free.
Step 6: Use a Transfer Paper
One more thing that we will use here is transfer tape, which will add a backing to the vinyl to protect it and allow you to adhere stickers safely on a surface. Hence, cut a transfer paper and adhere it to the top of the vinyl. Then, burnish the vinyl and peel off the backing. Finally, you can adhere the sticker to any surface. You simply need to burnish the sticker on a surface and slowly peel off the transfer paper.
Step 7: Transfer Design on a Surface
Finally, you can adhere your vinyl stickers to any surface easily. To adhere to the stickers, you need to peel off the transfer paper backing and position the sticker on the desired surface. Burnish gently for a secure fit.
Frequently Asked Questions (FAQs)
What Types of Vinyl Can Silhouette Cameo 4 Cut?
There are multiple types of vinyl that silhouette Cameo 4 can cut easily. For instance, adhesive-based vinyls, heat transfer vinyls, and stencil vinyls are used. Besides vinyl, Cameo 4 is also an expert in cutting diverse materials, including leather, fabric, wool, etc.
What Is Transfer Paper, and How Is It Used?
A transfer paper is a special paper containing a particular material that allows you to transfer different designs, texts, and images to other surfaces. These papers have great significance in the making of vinyl stickers by several DIY cutting machines like Silhouette Cameo 4.
Is Silhouette Studio a Paid Software?
No, Silhouette Studio is not a paid software. It is a simple software used to design and create different projects to be cut from Silhouette Cameo machines. Users can easily install this tool on their devices. However, it provides premium versions for designers and businesses to utilize advanced features.