Silhouette Alta Plus is the upgraded version of Silhouette’s first 3D printer that you can use to create custom 3D objects. It includes all the features of the original Alta, plus a few new elements. The addition of a fan in this new version makes it perfect when it comes to getting 3D prints. However, if you want to take your creativity to the next level, you first need to learn how to set up create in a new dimension (Alta +) and then take your creativity to an entirely new dimension. Fortunately, this guide contains easy step-by-step instructions to set up the Silhouette Alta Plus machine. Beginners, as well as a pro, can find it useful.
Step 1: Check Included Items in Box and Setup Machine
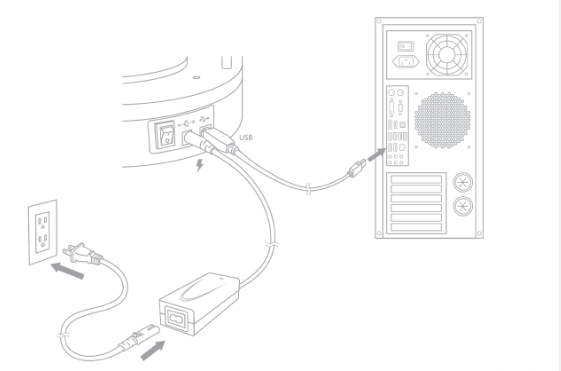
Before starting, check all the items the box contains. Ensure it includes the machine itself, power cord, USB cord, transfer tape sheets, platform, loose filament, and filament spool holder. Once you are ensured, connect the machine to the power supply and plug the power cord into an outlet. (It is recommended not to connect the USB to your computer).

Step 2: Downloading & Installation of Software
Click on your computer types, such as MAC (64-bit), WINDOWS (64-bit), and WINDOWS (32-BIT), to begin downloading the software. Once the download completes, select RUN the software setup and choose the default installation options as provided. You can launch the software once the installation completes or install it at any time. And then connect the Silhouette Alta+. For this, go through the steps mentioned below.
- First, power on your Silhouette machine and connect it to your computer via a USB cable.
- The next step (second) is to go to the 3d print panel.
- Navigate to the 3d print panel and click on it to open. Now, confirm that your device is connected to the included USB cable.
- Finally, confirm that your machine is connected and is displaying a “Ready” status.
Step 3: Get Access to FREE Designs with a 1-month Design Store Subscription.
25 FREE digital designs get added to your Account upon registering. You can log into your Account in the software library to confirm it. Here are the steps you can follow.
- If Silhouette 3D software still needs to be opened, open it first.
- Click on the Library tab, then.
- Once prompts appear, sign into your Silhouette account to set up your Library.
- Upon completing the setup process, you will find all your designs in the Library> Free with Machine > Alta Folder.
Note: An Internet connection is needed to open all the designs initially, but once they are in the Library, you can also utilize them offline. These designs get synced between all devices, and you can use them wherever you log into your Account.
In Silhouette Alta+, there is a FREE 1-month subscription to the Silhouette Design Store. When you download content, it will automatically get added to your Account’s Library, even when the subscription ends.
Step 4: Using Silhouette Machine and Software
The last step of how to set up create in a new dimension (Alta +) is to update and use the machine and software. Before heading to your first project, load your materials, mat, and blade properly. It should be your job to make sure that the setup is correct. Also, collect ideas on using the Silhouette Studio software and how to set up jobs accurately and send them to the device. This is the last step of how to set up create in a new dimension (Alta +).
Frequently Asked Questions
What Is Silhouette Alta Plus?
You can use a delta-style printer to create custom 3D objects. Silhouette Alta Plus is actually an upgraded version of Silhouette’s first 3D printer. When you pair it with Silhouette 3D™ software, you can create and prepare more designs.
What File Type Does Silhouette Alta Plus Use?
This machine comes with 25 free 3D designs. You can find these designs in your Library after registering successfully.
Can I Use Silhouette 3D Software with Other Printers?
Silhouette 3D Software is actually compatible with the Silhouette Alta plus model. When you try using it with other printers, there is no guarantee of the features and printing results.